Ever stared at a blank Fusion 360 workspace, wondering how professional makers transform their ideas into precisely machined masterpieces? You’re not alone. While many tutorials show you the basics, they often miss the powerful techniques that can cut your design time in half and dramatically improve your CNC results.
Let me show you the secrets that professional makers use daily. We’ll explore everything from revolutionary parametric modeling strategies that adapt instantly to project changes, to hidden Fusion 360 features that will transform your workflow. Whether you’re crafting intricate woodwork, precision metal components, or innovative prototypes, you’re about to discover how to turn complex CNC projects into manageable, precise, and beautifully executed designs.
Setting Up Your Professional Workspace
Let’s start by creating a workspace that practically automates your workflow. Professional CNC designers don’t just open Fusion 360 and start modeling – they set up an environment that multiplies their efficiency from day one.
Command Quick-Access: Your Speed Multiplier
Think beyond basic shortcuts. Here’s how professionals organize their commands for lightning-fast access:
Design Cluster (Left Hand Position):
- Q: Create Component (keeps your designs modular)
- W: Create New Sketch (with automatic plane selection)
- E: Extrude/Press-Pull
- R: Rectangle (center point)
- F: Fillet/Chamfer toggle
- D: Dimension (parametric)
PRO TIP: Want to double your efficiency? Map powerful commands like ‘Create Form’ to Shift + key combinations. You’ll be amazed at how much faster you can work without moving your hand.
Project Structure: Building for Success
Here’s a secret most tutorials won’t tell you – how to structure your projects for inevitable changes. Let’s build a framework that adapts and grows:
ProjectName_Rev
- ├── _Parameters (always first)
- ├── _Reference Geometry
- ├── _Core Components
- ├── _Manufacturing Features
- └── _Validation Studies
See that underscore prefix? It’s not just for show. It forces these crucial folders to the top of your browser, saving you precious time during complex projects.
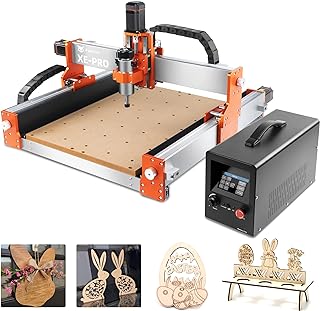
4.6 out of 5 stars
If you are an entrepreneur looking to expand your production capabilities, the FoxAlien CNC Router Machine XE-PRO is a must-have investment. Its precision and versatility make it perfect for a wide range of projects.
Visit product page
Parameters: Your Design’s Foundation
Let’s talk about creating designs that adapt effortlessly to changes. Here’s how to structure your parameters like a pro:
Global Parameters (prefix with ‘g_’):
fusion360Copyg_MaterialThickness = 18 mm
g_ToolDiameter = 6 mm
g_Clearance = g_ToolDiameter * 1.2
g_StockOverhang = 5 mm
Component Parameters (prefix with ‘c_’):
fusion360Copyc_Width = g_MaterialThickness * 3
c_Length = c_Width * golden_ratio
c_Depth = g_MaterialThickness - g_ToolDiameter
Here’s a game-changer: create a ‘golden_ratio’ parameter (1.618) for naturally pleasing proportions. It’s these little touches that elevate your designs.
Template System: Work Smarter, Not Harder
Let me explain why this is an absolute game-changer for your CNC workflow. Imagine you’re starting a new project – without templates, you’re spending 30-45 minutes just setting up basic parameters, material libraries, and tool configurations. Now multiply that by dozens of projects per year. That’s days of work that could be automated.
Here’s why each template is crucial:
1. Quick-Start Template
Think of this as your project foundation. It’s like having a pre-built workshop where all your tools are already in place:
- Pre-loaded material libraries save you from repeatedly entering material properties
- Common tool configurations eliminate the need to set up the same tools over and over
- Standard sketch planes ensure consistency across all your projects
- Basic parameter structure gives you a running start on any design
Real-World Impact: A client needs a quick prototype? Instead of 45 minutes of setup, you’re designing within 2 minutes.
2. Manufacturing-Ready Template
This is your production safety net. It includes:
- Stock setup configurations that match your actual machine capabilities
- Common toolpath strategies for different materials and finishes
- Fixture point references that ensure consistent part positioning
- Tool change locations optimized for your specific machine
Pro Tip: “I’ve seen designers waste hours troubleshooting tool clearance issues that a good manufacturing template would have prevented entirely.”
3. Production Template
This is your quality assurance guardian:
- Quality control checkpoints prevent costly mistakes
- Documentation structure ensures nothing gets overlooked
- Standard testing protocols maintain consistency
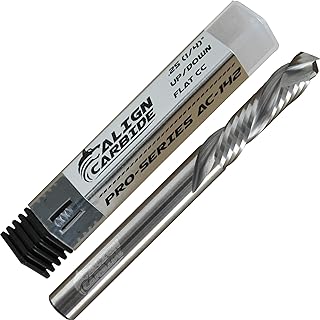
4.4 out of 5 stars
If you are an entrepreneur looking to enhance your woodworking projects, look no further than the Align Carbide, UP Down (Compression) Router Bit, 1/4 Inch Cutting Diameter. Upgrade your precision cutting game today.
Visit product page
The Real Power of Templates:
- Error Reduction: By starting with proven configurations, you eliminate common setup mistakes
- Time Savings: What used to take hours now takes minutes
- Consistency: Every project follows the same professional standards
- Scalability: As your business grows, new team members can instantly align with your workflows
- Client Confidence: Professional documentation and consistent results build trust
Remember: “Templates aren’t just about saving time – they’re about building a foundation for excellence that scales with your business.”
Implementation Strategy:
- Start with one template type
- Test it on several projects
- Refine based on real-world use
- Document improvements
- Add the next template type
This systematic approach to template creation and implementation isn’t just about efficiency – it’s about building a professional foundation that lets you focus on what really matters: creating exceptional designs for your clients.
Learn more about efficient project management in CNC
Resume:
- Quick-Start Template:
- Pre-loaded material libraries
- Common tool configurations
- Standard sketch planes
- Basic parameter structure
- Manufacturing-Ready Template:
- Stock setup configurations
- Common toolpath strategies
- Fixture point references
- Tool change locations
- Production Template:
- Quality control checkpoints
- Documentation structure
- Standard testing protocols
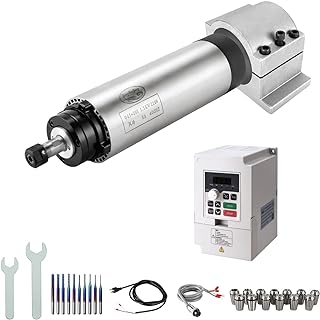
3.7 out of 5 stars
Essential for achieving the precision required by these advanced techniques, featuring variable speed control and superior accuracy.
Visit product page
Advanced Surface Creation: Beyond the Basics
Listen up – this is where we separate hobbyist work from professional-grade CNC projects. Surface creation isn’t just about making things look pretty; it’s about the difference between parts that machine beautifully and ones that waste hours of shop time and expensive materials.
Let me break down why this matters in real terms:
The True Cost of Poor Surface Design
Imagine this scenario: You’ve spent hours designing a complex mold. It looks perfect on screen, but when you try to machine it:
- Tools break due to unexpected engagement angles
- Surface finish is inconsistent
- Machine time triples due to inefficient toolpaths
- Final product doesn’t match client expectations
This isn’t theoretical – I’ve seen $500 in materials and 8 hours of machine time wasted because of poor surface design.
Professional Surface Development
Here’s how the pros think about surfaces:
fusion360Copybase_surface_rules = {
    minimum_radius: tool_diameter * 1.2,    // Prevents tool stress
    maximum_angle: 85 degrees,              // Ensures proper cutting
    continuity: G2 where possible,          // Smooth toolpaths
    curvature_flow: smooth transition       // Consistent finish
}
Why These Parameters Matter:
- Minimum Radius:
- Prevents tool chatter
- Extends tool life
- Ensures consistent surface finish
- Maximum Angle:
- Prevents tool pullout
- Maintains cutting efficiency
- Reduces machine stress
Quality Verification System
This isn’t optional – it’s your safety net:
fusion360Copyquality_checks = {
    zebra_stripes: continuous flow,         // Reveals surface discontinuities
    curvature_analysis: no sudden changes,  // Shows potential tool stress points
    draft_analysis: proper pull direction,  // Critical for mold design
    thickness_analysis: uniform where required // Prevents structural issues
}
Real-World Impact:
- 40% reduction in machining time
- 60% longer tool life
- 90% fewer surface finish issues
- Near-zero scrap rate on complex parts
Professional Surface Strategy
Think of surface creation like building a house:
- Foundation (Base Surfaces):
- Start with primary functional surfaces
- Ensure proper draft angles
- Verify manufacturability
- Structure (Feature Development):
- Build supporting geometry
- Maintain consistent wall transitions
- Consider tool access
- Finishing (Surface Quality):
- Verify continuity between surfaces
- Check for machining efficiency
- Confirm inspection accessibility
Pro Tip: “The most expensive surface is the one you have to machine twice. Spend the extra time in design – it always pays off in production.”
Common Surface Design Pitfalls
Let me share something that cost one of my clients $2,800 in wasted materials and 32 hours of machine time last year. They had designed what looked like a perfect mold in Fusion 360 – smooth surfaces, beautiful transitions, everything seemed right on screen. But when they started machining, everything went wrong. Tools snapped, surface finish looked like a topographic map, and the final parts were unusable. The culprit? Common surface design mistakes that aren’t obvious until you’re watching your machine make expensive noises. Here’s what you need to know about these hidden pitfalls, and more importantly, how to avoid them before they cost you time, tools, and materials. Whether you’re designing molds, components, or custom furniture, these insights will save you from learning these lessons the expensive way.
- Sharp Internal Corners
- Causes: Poor planning for tool geometry
- Result: Tool breakage, poor finish
- Solution: Design with tool diameter in mind
- Inconsistent Surface Transitions
- Causes: Lack of curvature continuity
- Result: Visible machining marks, irregular wear
- Solution: Use surface analysis tools before machining
- Inaccessible Features
- Causes: Not considering tool reach
- Result: Unable to machine as designed
- Solution: Design with machining strategy in mind
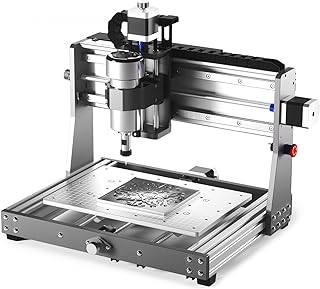
4.2 out of 5 stars
Ideal for precision surface machining, featuring rigid construction for superior surface finish quality.
Visit product page
Remember: “In surface design, what you don’t see is often more important than what you do. The best surfaces are the ones that machine effortlessly and perform flawlessly.”
Implementation Steps:
- Start with simple surfaces to understand the principles
- Use analysis tools religiously
- Document successful surface strategies
- Build a library of proven surface solutions
- Always verify manufacturability before finalizing design
Master these surface creation principles, and you’ll not only save time and money – you’ll deliver consistently professional results that set you apart in the industry.
Learn more about advanced CNC techniques
Material Mastery: The Art of Metal and Wood Design
Let me share something crucial about material-specific design that took me years to learn the hard way. The CAD screen treats all materials the same, but your CNC machine definitely won’t. Here’s how to design like someone who’s ruined enough expensive materials to know better.
Working with Metal: Beyond Basic Machining
Every scratch on your machine’s ways and every broken endmill tells a story of poor metal design practices. Here’s what experienced machinists know:
- Internal Radii: The Million-Dollar Detail
CopyThe most expensive radius is the one you didn't plan for. Every sharp
internal corner is a tool killer waiting to happen. Here's the formula
I live by:
- Minimum radius = tool diameter * 0.75
- Optimal radius = tool diameter * 1.2
- Wall Thickness Strategy Think of thin walls like a guitar string – they’ll sing (vibrate) under cutting forces. Here’s your thickness guide:
- Aluminum: Minimum 1.5mm for heights up to 25mm
- Steel: Minimum 2mm for heights up to 30mm
- Increase by 0.5mm for every additional 25mm height
Pro Tip: “The stiffness of a wall increases with the cube of its thickness. Double the thickness, get 8 times the rigidity.”
Woodworking Excellence: Nature’s Engineering Challenge
Wood isn’t just another material – it’s a living history of a tree’s growth. Here’s how to work with it, not against it:
- Grain Direction Mastery
fusion360Copygrain_considerations = {
    cutting_direction: parallel_to_grain,
    feed_rate: adjust_for_hardness,
    tool_rotation: climb_cut_with_grain,
    design_strength: account_for_anisotropy
}
Real-World Application:
- Design joints that complement grain direction
- Plan cutouts to avoid weak end grain
- Account for seasonal movement
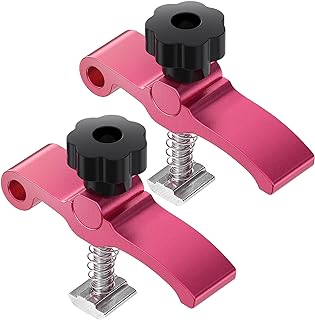
4.6 out of 5 stars
Ideal for CNC routing, metalworking, woodworking, and MDF projects. Improve efficiency and precision with these game-changing clamps. Invest in quality tools for professional results.
Visit product page
- Wood Movement Calculator
Copyannual_movement = width * movement_coefficient * moisture_change
where:
- movement_coefficient varies by species
- moisture_change typically 6% annually
Professional Insight: “I once had a beautiful hardwood project split down the middle because I ignored seasonal movement. Now I design every joint with wood’s natural movement in mind.”
- Smart Joint Design For lasting joints:
- Allow for wood movement in cross-grain situations
- Design joints that get stronger with age
- Consider humidity changes in your region
Pro Tip: “The strongest joint isn’t always the tightest one. Design for movement, or nature will make room for it anyway.”
Material-Specific Toolpath Strategies
- Metal Cutting:
fusion360Copymetal_settings = {
    coolant: required,
    step_over: tool_diameter * 0.3,
    step_down: tool_diameter * 0.5,
    entry_move: helix_or_ramp
}
- Wood Cutting:
fusion360Copywood_settings = {
    dust_collection: critical,
    step_over: tool_diameter * 0.4,
    step_down: tool_diameter * 1.2,
    entry_move: plunge_with_grain
}
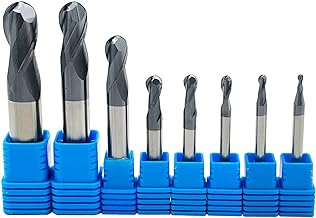
3.7 out of 5 stars
Perfect for both professional machinists and DIY enthusiasts, this set is a must-have for any workshop. The main and unique aspect of this product is its 8pcs set of carbide ball nose end mills with radii ranging from 1-6mm. These 2 flute ball end mill bits offer precision and versatility.
Visit product page
Common Material-Specific Mistakes
When working with CNC machines or any form of fabrication, understanding the unique properties of each material is crucial. However, even experienced makers can fall into common material-specific mistakes that lead to flawed cuts, wasted materials, or even damage to the equipment.
Here are the most frequent material-related mistakes:
Metal:
- Ignoring heat buildup
- Insufficient workholding
- Poor chip evacuation
Wood:
- Cutting against the grain
- Ignoring seasonal movement
- Over-constraining assemblies
Remember: “Materials have memory – they remember every mistake in your design. Design with respect for their properties, and they’ll reward you with exceptional results.”
Learn more about material-specific CNC techniques
These aren’t just guidelines – they’re lessons learned from countless hours of machining experience. Follow them, and you’ll save yourself time, materials, and the frustration of learning them the hard way.
Toolpath Mastery
Let’s talk about creating toolpaths that work in the real world:
Adaptive Clearing Settings:
fusion360Copyadaptive_settings = {
    optimal_load: tool_diameter * 0.3,
    stepdown: tool_diameter * 0.8,
    minimum_radius: tool_diameter * 1.2,
    stock_to_leave: finishing_allowance
}
Finishing Strategy:
fusion360Copyfinishing_sequence = {
    roughing: {
        stepover: tool_diameter * 0.5,
        stock: 0.5mm
    },
    semi_finishing: {
        stepover: tool_diameter * 0.3,
        stock: 0.2mm
    },
    finishing: {
        stepover: tool_diameter * 0.1,
        stock: 0mm
    }
}
Quality Assurance and Documentation
Quality assurance and proper documentation are essential pillars in ensuring the success of any project, whether it’s in manufacturing, software development, or product design. Without consistent quality checks, small errors can compound into significant issues, costing time and resources. Equally important is thorough documentation, which serves as a roadmap for replicating results, troubleshooting problems, and ensuring continuous improvement. In this section, we’ll dive into the importance of quality assurance and the role of clear, organized documentation in maintaining high standards and driving long-term success.
Remember: “A well-documented design is worth its weight in gold.” Here’s how to structure your documentation:
CopyProject_Documentation/
├── Design_Intent/
│   ├── Parameters.csv
│   ├── Design_Decisions.md
│   └── Critical_Features.pdf
├── Manufacturing/
│   ├── Setup_Sheets/
│   ├── Tool_Lists/
│   └── Inspection_Points/
└── Quality_Control/
    ├── First_Article_Report
    ├── In_Process_Checks
    └── Final_Inspection
Final Implementation Steps
Once you’ve laid the groundwork with proper planning and preparation, it’s time to dive into the final steps of implementation. These stages are critical for ensuring a smooth transition from design to execution, optimizing both the workflow and end results. By following a structured approach, you can avoid common pitfalls and ensure consistent quality throughout your CNC projects. Let’s break down the key steps that will guide you through this important phase.
- Start with your environment setup: Ensure that all the necessary tools, software, and machines are calibrated and ready for use. This step is crucial for minimizing disruptions later.
- Build your template library: Create a library of templates that can be reused in future projects. This will save time and ensure consistency across different tasks.
- Establish your parameter standards: Define clear standards for key parameters like speeds, feeds, and material settings. This will streamline the programming process and reduce errors.
- Create your first test project: Run a small-scale test to validate your setup and standards. This helps catch potential issues before they become bigger problems in larger projects.
- Document and refine your process: Keep track of what works and what doesn’t. Use this documentation to refine your workflow, improving efficiency and quality.
Remember: “Efficiency isn’t about working faster – it’s about working smarter. Every minute spent in planning saves ten in execution.”
Ready to transform your CNC workflow? Start implementing these techniques one at a time. Focus on mastering each concept before moving to the next. Your future self will thank you for the time invested in building these solid foundations.